Showing posts with label Breakfast. Show all posts

Tuesday, 27 December 2022

Red Rice Puttu / Sivapu Arisi Puttu


INGREDIENTS for making Homemade Puttu Flour : 

Red rice - 1 cup
Raw rice - 1 cup
Water


METHOD:

1. First, wash the two types of rice in a clean water three times and let it soak for an hour.

2. Then, drain the rice in a basket or colander until it has drip off the excess water.

3. Now, lay a cotton cloth or wide towel on a table and spread the drained rice on the cloth. Let it dry for 30 minutes.

4. Don't dry it under the sun, dry it on a table would be suffice. 

5. Grind the rice to fine powder.

6. After that, you need to dry roast the powder in a wok under low flame. The rice powder should release nice nutty aroma and it will be ready when it resembles like sand. Let this flour to cool completely. 

7. Last step is to sieve or sift the flour and can be stored in a air-tight container for use.


INGREDIENTS for making Puttu : (serving for 5 people)

Prepared rice flour - 2 cups
Water - as needed
Salt - 1/2 teaspoon
Grated coconut - 1 cup
Organic brown sugar or jaggery - as needed
Cooked yellow mung bean - 4 tablespoons (optional)


METHOD:

1. Take the prepared rice in a wide bowl. Sprinkle some water that has been mixed with little salt. Mix the flour using your hand with sprinkle of water to resemble like breadcrumbs. This should not neither be wet nor dry. When you clump the flour in your hand, you should be able to press together without falling apart. That should be ready to go to the next process.

2. Heat idli pan, puttu maker by adding water to it. 

3. If using idli pan, you need to spread white cotton muslin cloth on the idli mould pan, then spread the prepared puttu flour on the cloth. Close the lid and steam it for a good 20 minutes.

4. If using puttu maker, alternate between puttu flour and freshly grated coconut forming layers of flour and coconut.

5. The steamed puttu is removed from the idli pan. You need to put this in a wide bowl. Next, mix freshly grated coconut, cooked yellow mung bean and brown sugar as per your liking and serve for breakfast. 

6. This is a healthy and nutritious South Indian Breakfast menu.


Thank you

Abby 


Tuesday, 25 May 2021

Indian Style Mini Semolina Dumplings - Rava Ammani Kolukattai

I find this breakfast to be the cutest and further more it's healthy because they are steamed dumplings. Of course, frying them with little bit of oil will take it to the next level. The dumplings are infuse in Indian tempering spices that gives nuttiness, spice and salty flavor. Sometimes, I also add shredded carrot into the dough so that it adds color and nutrient to the dish. 

Indian Style Mini Semolina Dumplings - Rava Ammani Kolukattai


INGREDIENTS: 

Fine semolina/ Bombay rava - 1/2 cup
Rice flour/ Idiyappam flour - 1 cup
Butter - 1 teaspoon
Red chili powder - 1/2 teaspoon
White sesame seeds - 1/2 teaspoon
Shredded carrot - 1/8 cup (optional)
Water - 1 cup plus 1/2 cup
Green chilies - 2 to 3
Ginger - 1/2 inch
Salt to taste

TO TEMPER:

Oil - 2 teaspoons
Mustard - 1/2 teaspoon
Urad dal - 1/2 teaspoon
Asafoetida - 1/4 teaspoon
Curry leaves - 2 sprigs
Grated fresh coconut - 2 tablespoons

METHOD:

1. Heat a pan, add a cup of water, red chili powder, butter, white sesame seed and salt to taste. 

2. Let the water boil. Then, gradually add the semolina or Bombay rava. Stir vigorously until there is no lumps. If you find the rava is still uncooked, you may add a bit more water. Make sure the semolina is cooked well. Let it cool slightly.

3. When the semolina is warm to touch, mix rice flour, chopped green chilies, shredded carrot (optional) and chopped ginger. Knead well into a non sticky pliable dough with enough water. 

Pliable dough


4. Next, oil your hand and shape the dough into mini size balls. 

Mini size balls


5. Later, steam the mini balls in a steamer until the balls are cooked to perfection.

6. In pan heat two teaspoons of oil, temper all ingredients under the 'TO TEMPER' section. 

7. Add in steamed mini dumplings into the pan, and start frying the balls until the tempering ingriedients have coated the ball well for 5 minutes. 

8. Lastly, after switching off the flame, sprinkle some fresh grated coconut and give a light toss.

9. Serve hot for breakfast. 


Thank you

Abby 

Arisi Upma With Basmati Rice

This dish is really apt for breakfast, and it is very commonly prepared by Indians. It's basically made of rice and Toor dal that are turn into semi-coarse grits along with other ingredients such as black peppercorns and cumin seeds. Pepper and cumin are really good for digestion and to increase your immune system. It soothes your throat infection and increase your appetite. Fresh coconut is added in the end to elevate the flavor of upma to another level. Every ingredient has it's own benefit, so using it in our breakfast will be a guarantee to a healthy lifestyle.

Arisi Upma With Basmati Rice 


INGREDIENTS: 

Basmati rice - 1 cup
Toor dal - 1 tablespoon
Cumin - 1/2 teaspoon
Black peppercorns - 1/2 teaspoon
Water - 5 cups 
Grated white coconut - 1 big handful
Salt to taste

TO TEMPER:

Gingerly oil - 3 tablespoons
Mustard - 1 teaspoon
Cumin - 1 teaspoon
Urad dal - 1 teaspoon
Channa dal - 1 teaspoon
Green chili - 1
Dry red chili - 1
A sprig of curry leaves
Asafoetida - 1/2 teaspoon


METHOD:

1. First, wash rice and toor dal thoroughly for three to four times. Drain them in a colander for 15 minutes, and after that spread them onto to a clean white cotton towel to air dry leaving no water. 

2. Now, we can move to the grinding process. Take the dry rice and toor dal along with 1/2 teaspoon of cumin and black pepper into a jar and grind into a slightly coarse but not too coarse just like the semolina texture. This you can store in an air tight container for an instant upma anytime for breakfast.

Coarse upma grits


3. This is prepared for three people, so I used all the ground rice-dal grits. 

4. Heat a deep bottom pan, and start pouring 3 tablespoons of gingerly, and temper all ingredients under the 'TO TEMPER' section.

5. Add 5 cups of water, salt to taste and grated coconut and allow the water to boil. At this stage, gradually sprinkle all the ground rice-dal mixture into the rolling water. Start stirring vigorously and continuously in order to avoid lump formation. 

6. Allow this grit to cook by closing the pan with a lid. This will make the cooking process faster. 

7. Switch off flame when the grit has absorbed all the water and seemed to be semi-dry. You can see the edges has developed oil, and it's good. 

8. Serve this hot with tomato chutney


Thank you

Abby 

Savory Fenugreek Coconut Milk Porridge - Vendeya Kanji

This is a delicious, warming savory coconut milk porridge that is good as a cooling agent during heatwave or summer. You can eat this porridge with a Horsegram tuvayal or Vellam or jaggery.

Savory Fenugreek Coconut Milk Porridge - Vendeya Kanji


INGREDIENTS: 

Raw rice or pacharasi - 1 cup
Yellow moong bean/ pasiparuppu - 1 tablespoon
Fenugreek - 1 teaspoon
Garlic - 1 whole pod(Peeled and no need to chop)
Water - 5 to 6 cups of water
Grated coconut from 1/2 coconut
Salt to taste

METHOD:

1. Rinse the rice thoroughly for three times. 

2. Dry roast the yellow moong bean and fenugreek. 

3. In a deep bottom pan, cook rice, fenugreek, garlic and roasted yellow moong bean with 5 to 6 cups of water until the rice is slightly mushy. 

4. There will be some water in the rice and this dish has to be semi flowing consistency. At this stage, after the rice is done switch off the flame and add salt as per your taste.

5. Lastly, using 1/2 coconut, grate and extract thick coconut milk from it. You may use 1 cup of water to extract coconut milk. 

6. This coconut milk is added after switching off the flame. Stir well to combine. This porridge is served best with horsegram chutney.

Savory Fenugreek Coconut Milk Porridge - Vendeya Kanji


Thank you

Abby 

Tuesday, 7 April 2015

Karuppatti Aapam (Palm Sugar Pancake with Coconut Milk Sauce)


An  effortless way of making aapam or Indian style of fermented pancake. Most of the ingredients you can find in your  pantry except for sour dosa batter which I will post the method of making later. Enjoy!


Karuppatti aapam

Pan


Ingredients for aapam or pancake :

Grated fresh white coconut : 1 cup
Sour dosa batter : 2 cups
Rice flour : 2 cups
Karuppatti (Palm sugar) : 1/2 -1 cup (depends on how sweet you want your pancake to be)
Salt :  1/2 tsp


Ingredients for making salted coconut milk:

Freshly grated coconut : 1 cup
Hot water 
salt : 1/2 tsp 

Method :


1. Grind the grated coconut, dosa batter and rice flour with 1/4 cup of water or little bit more till become smooth paste ( You should not add a lot of water. This batter has to be thick at this stage.)

2. Now mix 1/2 tsp of salt with the aapam batter and let it ferment overnight. You can keep the closed batter in a dry place outside. (Do not keep in refrigerator during fermentation process) 

3.The next morning, you can prepare palm sugar syrup by boiling it with 3/4 cup of water till well dissolved and slightly thick. Strain the impurities left at the bottom of the sugar syrup. Let it cool completely (You can also prepare sugar syrup prior to making aapam in the morning).

4. Mix palm sugar syrup with fermented pancake batter (You need not add all the syrup, taste the batter while mixing it in). At this stage, you need to add water to make it slightly a loose batter but not watery.

5. Extract coconut milk by using freshly grated coconut and hot water. We want to obtain semi thick milk so adjust the water quantity. Mix salt. This is the sauce for the pancake. It's an unsweetened coconut milk sauce.

6. For making this pancake, a special kind of wide and hollow pan with two handles at sides is needed. Add, 1/2 tsp of oil into the pan and wipe it of lightly using a tissue. First scoop a ladle full of batter and start swirling around ( If the batter is too thick, you may not able to swirl well.So keep the batter loose but not watery) . Keep the flame on low. You will notice it has a shape of a round boat. This pancake once cooked will loosen sides indicating time to remove it from the heat.

7. Drizzle generous amount of salted coconut milk on it before serving. If you can't find this type of pan, then you can make conventional pancake but thinner perhaps. 


-Abby

Thursday, 5 February 2015

SPICY Guilt free steamed dumpling (kara pidi kolukattai)


These dumplings are easy to prepare with minimal ingredients that you can always find stored in your refrigerator. Plus, no deep frying with immersed oil dripping all the way through the food that sometimes leaves us with a sudden sense of guilt and repentance. This dumpling recipe is spicy and doesn't even need any condiment to dip. For me it's a worth trying dish not because I'm posting it here on my blog. Enjoy.


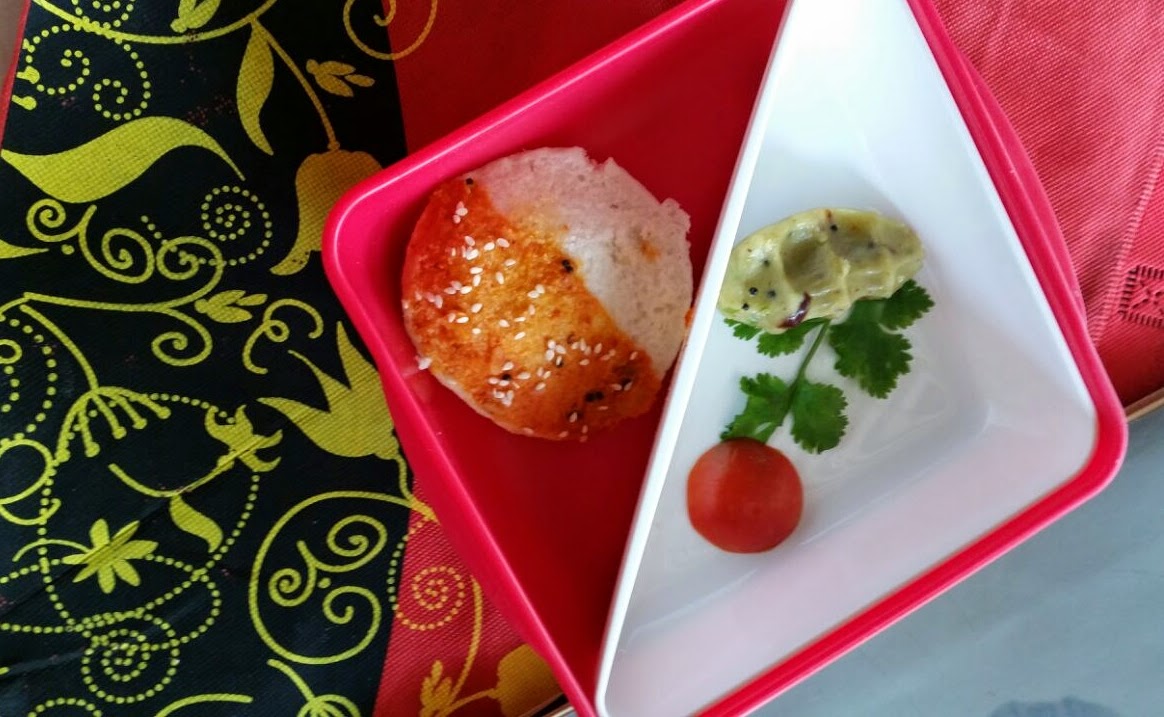
From the left to right : Idli and spicy steamed dumpling (kara pidi kolukattai)


Ingredients :

Rice flour or Idiyappam flour (can get it from any Indian stores) : 1 cup
Yellow moong dal (the one without skin) : 1 tbsp (soaked for 2 hours) 
Green chillies : 4 (I f you can stand the heat)
Grated coconut : 1/4 cup
Fresh ginger :  1 1/2 inches
Asofetida or hing :  a pinch (optional)
Mustard seeds : 1/2 tsp
Cumin seeds : 1/2 tsp
Dry red chillies : 1 (remove the seeds and nick it to small pieces)
Indian sesame oil or any cooking oil : 1/2 tbsp
Boiled water : as needed
Salt : as needed

Method :

1. Grind the green chillies, grated coconut, asofetida, ginger piece and salt by adding little water to form a smooth green paste. 

2. In a heated pan, pour 1/2 tbsp of oil and start tempering the mustard seeds till they sputter and gradually add in the cumin seeds, dry red chilli. Start mixing the blended green paste with 1/8 cup of water. Let it boil for 5 minutes to get rid of the raw chilli smell.

3. After that, switch off the stove. To the same pan, add a cup of rice flour and start mixing green paste, flour and add the soaked yellow moong dal together. At this point, water may not enough so you will need to add only boiled water to form a non sticky pliable and smooth dough.

4. You may shape the dough into desirable patterns or round balls. Steam the balls in a steamer for a good 15 - 20 minutes.

5. Serve hot as it is or with chilli sauce.

-Abby

Tuesday, 3 February 2015

Spicy Indian Omelette (Pure Vegetarian)

I love egg omelette but being vegetarian on certain days, this lentil based pancake or omelette makes my day perfect. It has all the nutrients and most importantly taste good without additional non-vegetarian items. It is an easy to prepare dish with aromatic herbs added as a  digestion improver and give a nice blend of flavor. Fermentation is not required when making this thick batter. But do not leave the batter outside as it has the tendency to turn sour and always keep the leftover batter in the fridge. I recommend you to use as much lentils as you want to make on that day and keep the extra soaked lentils in the fridge and you can use it again on the next day or you could even make pakora or deep fried lentil batter out of it. Always add the finely chopped onion when you are ready to make the omelette.

Spicy Indian Omelette


Ingredients :

Green Moong dal(with skin) : 1/2 cup
Raw rice : 1/4 cup
White soya bean : 1/8 cup
Toor dal (Pigeon eye dal) : 1/8 cup
Asofetida or hing : 2 pinches (optional because we already use saunf or fennel seeds)
Medium sized onions :2
Coriander leaves : 1/4 cup (Finely chopped)
Curry leaves : 4 sprigs


Ingredients to grind into smooth paste :

Dry red chillies : 6 (adjust accordingly, I prefer spicy)
Fennel seeds : 2 tsp
Cumin seeds : 1/2 tsp
Fresh turmeric :1 inch piece
Salt : as needed 

Method :

1. Soak dal and beans in a sufficient water for overnight.

2. After 9 - 10 hours, drain off excess water in a colander.

3. Grind all ingredients mentioned under 'Grind' section to smooth paste by adding enough water. Its okay if there are small particles of fennel and cumin seeds, I call that rustic way of cooking and it adds some kind texture to the omelette. Well, its an excuse for my hasty way of cooking.

4. Now, add drained beans and dal to the red paste and start pulsing the liquidizer after short run. You must add water little by little and turn the paste to coarse one. Do not make smooth paste as the omellete will be way too soft with no crispiness. The coarse paste is similar to the one when you make masala vadai. That means you can still see small bits and pieces of dals here and there. I would say 70 percent coarseness. 

5. No fermentation required here. 

6. Finely chop the onions, curry leaves and coriander leaves. Add all to the beans and dal mixture with salt if needed and 2 pinches of asofetida. 

7. Add enough water to make semi thick batter. Heat a flat pan, and take 1 small stainless steel bowl of batter and start swirling on the pan's surface forming a uniform circle which has to be slightly thin. Add Indian sesame oil or any cooking oil at the sides of the omelette and also on top of it. 

8. We are looking for nice brown crust at bottom and top of the omelette. Turn to the other side and cook till it's light brown and crispy. 

9. Unlike thosai, this omelette a.k.a pancake cannot be swirled smoothly and flawlessly because of the semi thick and coarse batter. You will have to struggle here but practice makes perfection. By adding oil to the bottom of the swirling bowl, you can swirl better.

10. Serve hot with green chilli and coconut chutney.

-Abby

Monday, 16 June 2014

Poori


Poori is an Indian deep fried savory bread which is puffed during the frying process. The puffed appearance not only gives pretty look to it  but also further cooks the dough and at the same time retains the softness of the bread through the steam trapped inside. The outer layer has crispiness given by the added rava or semolina and the inner part is soft and chewy. There aren't any special ingredients used to elevate the dish but I'm only sharing the recipe with the viewers. The right consistency of the dough will allow the poori to puff or else it will only turn to be a flat bread. The dough should not be too watery or too hard. Practise makes perfect and the quality of atta or whole wheat flour is also crucial for crispy and soft bread. The poori is best served with potato masala or potato kurma.

Poori

Ingredients :

Homemade atta flour or whole wheat flour : 1 1/2 cups
Rava or semolina : 2 tbsp
Hot oil : 1/2 tbsp
Salt : as needed
Water : as needed (I don't want to give the water measurement as different type of flour may absorb water more or less)
Oil : enough for deep frying

Method:


1. Sift flour in a wide bowl and mix the rest of the ingredients as well including 1 tbsp of hot oil with enough water to form slightly stiff dough but not too hard and dry.

2. Pinch a small ball of a size of medium lime and using rolling pin and board, roll it into a small disk with even surface of not so thin or thick. You may dust a little whole wheat flour for dusting the board in order to prevent the poori from clinging to the board but don't too much flour as the poori may not puff up.

3. You need to fry one poori at a time on a medium flame. Make sure there is enough oil for deep frying in the pan and the oil is hot enough for frying those pooris. Lightly drizzle the hot oil from the pan over the poori while frying to encourage poori to puff and float above the oil. Turn to the other side for a few minutes and remove the poori to a plate laid with oil absorb paper.


Spicy Vegetable Biryani

  Spicy Vegetable Biryani INGREDIENTS :  Basmati or Seeraga Samba rice - 2 cups Water - 3 1/2 cups Oil - 3 tablespoons Ghee - 2  teaspoons C...